Showing posts with label Modeling. Show all posts

Monday, May 15, 2017

Shadowquisimunda

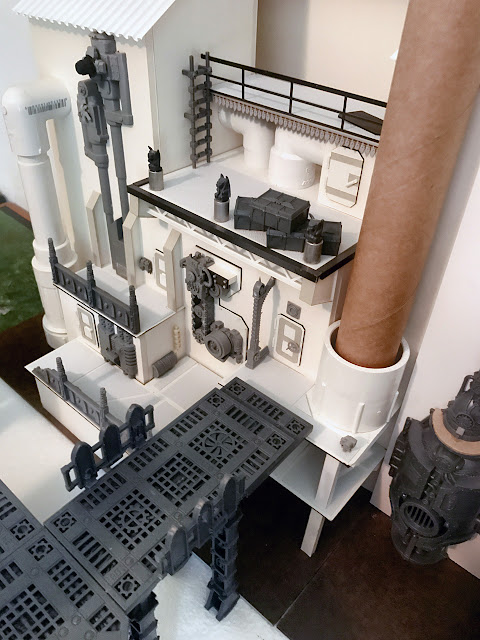
I really can't decide what to call this game. I suppose going forward, I'll start using Shadow War, but the publication of this book has sparked a return to multiple projects. For instance, this weekend I worked on a little terrain...


Forgive the photos in this post, they were taken with my phone. Still very much a WiP (see all those white and grey rectangles along the right hand side of the photo below? Those are doors that belong on the walls above there current locations).


This project was actually something I started in 2001...


It was a table I was designing for Inquisitor, which I was planning on playing in 28mm (though I ended up buying and painting around 30 of 54mm models... maybe that deserves a post at some point). Aaaaaanyway, the launch of the game featured a battle report with an incredible backdrop factory that filled one whole table edge. As Inquisitor was designed to be played on a 4x4' table in 54mm, I launched a similar project for a 2x2' board.

I have the attention span of a four year old and followed the game into 54mm as I said and probably jumped from that to 40k or Mordheim or Napoleonics or... you get the idea. The model above was tucked away. I've actually returned to his project several times over the years, but never really got around to finishing it. Hell, I might not finish it this time, but at least the release of the industrial kits for Shadow War (and the looming release of 40k eighth edition, which is actually closer to the Rogue Trader rules than the game has been in decades... hmm, that sounds like a topic for another post) got me to pull out the half forgotten shells of project. I spent a couple of days happily carving up foam core, inhaling glue fumes, and generally making a mess across the entire top floor of my home as I rummaged through closets looking for that bit I just know I had tucked away (and leaving piles of stuff around the room as I dug through).


The board needs to be crowded for Inquisitor so this 2x2' board is packed and only needed room for 3-5 models per side to go at it, but all of the terrain will work equally well if I spread it out on a 4x4' or 4x6' table (and add it to my large collection of urban ruins and other 40k stuff). Heck, I've got three or four more of these new kits still in the cellophane! There's still a ton to do, but I thought I'd share a couple of WiP pics and get a cheap blog update out of all this work.


More later (hopefully)...

Thursday, September 1, 2016

Rogue Trader Control Tower Challenge

Nothing says Rogue Trader like dessert tub terrain. With all of the cool modern stuff out there is it crazy to want a few buildings made from left over take out containers and drinking straws?


I'm going to basically build three buildings like those above - my core containers are shaped a little different, but the concept will be the same. Tan towers, minimalist detail, and a bit of weathering. No idea how long this will take, but I'll post updates as I go.

But why should I have all the fun? I'd like to challenge all of the RT community to come up with their own recycled terrain project in September (or devote a post or two to showing off stuff you already have - I know you're out there because I've seen stuff on your blogs before). Feel free to incorporate stuff from your bitz box to add details, but the main feature should be some plastic of styrofoam that started life as something mortal before you made it awesome!

No there's no prize, but I'd love to see what you come up with...

Tuesday, April 14, 2015

Natasha's Luck, Part Three

Here is my progress with a fast pinnace or shuttle for Warhammer 40k... Factory Fresh...


...and the Working Class Girl...


In the top set of photos's I painted the stylish stripes with GW's Averland Sunset (Base). Then I set about adding some variation in the hull color by washing different panels and equipment with GW Shades - Nuln Oil, Seraphim Sepia, Carroburg Crimson, or Agrax Earthshade. By using washes instead of paint I was able to maintain a unity of tone and keep all of the lovely variation that came from the earlier drybrushing and blending. Then I added decals from several GW spare sheets - I think a Baneblade and Imperial Knight.

Then I set out the mar the factory finish and you can see the results in the bottom two photos. First I nicked up the decals and stripes by painting small chips with Vallejo US Field Drab, which blended nicely back into the hull color. Then I used a sponge to stipple GW Mournfang Brown and Skavenblight Dinge over the entire model. I hand painted 'NATASHA'S LUCK' on the left wing with GW White Scar (Layer). I toyed with the idea of having some custom decals made, but decided I liked the look of the hand done lettering for a 40k vehicle.

It's getting close to being finished. It's actually fine as is, but I want to apply some targeted oil washes and weathering powders - these will be fairly subtle. It is easy to overdo weathering and I want this to look like a hard working vehicle, not a derelict! There are a few more details to pick out and a couple rounds of varnish, but I am really happy with how this turned out and am already thinking of my next conversion!

The next time I post pics of Natasha's Luck, I will have her set out with terrain...

Sunday, April 5, 2015

Natasha's Luck, Part Two

Here is a quick of shot of the progress on Natasha's Luck, a fast pinnace or shuttle for Warhammer 40k.


I started with a black undercoat followed by spraying it with brown from directly above and about three feet away which produced a very nice gradient across the hull. Then I used a large brush to overpaint (basically a heavy drybrush that covers the raised surfaces while leaving the lower areas the base color) with Vallejo US Field Drab. I followed this with the more traditional drybrushing of Vallejo Green Ochre. The final step so far was carefully drybrushing the sharp edges with Vallejo Dark Sand.

This thing has skipped ahead in the queue, though I have lots of stuff I'm working on in parallel (more Undead starting tomorrow)! I have quite a bit to do, but the basic hull color is finished minus one last highlight to bring out the major shapes of the hull. Next I'm going to paint in various details, use some controlled washes to add some variety to a few of the panels, and add decals before moving on to weathering...

Oh, Happy Easter!

Tuesday, March 31, 2015

Natasha's Luck, Part One

I've spent quite a bit of time over the last few weeks putting together a landing craft called Natasha's Luck for my Rogue Trader, Marko Steelknife. The base for the model is an old 1:72 scale Deep Space Nine Runabout that seemed to be about the right size. With the addition of a few parts from my bits box I think I was able to 'upscale' the model fairly well - at least to the point that it will work for the wargame table! The Forge World Arvus Lighter would have been ok, too, but wasn't really as big as I wanted. This model ended up 13" long and 7 1/2" wide which is a good footprint for a piece of terrain.


I never really got into Deep Space Nine, so the design wasn't one I was automatically familiar with which helps my suspension of disbelief (Oh, look, the Millennium Falcon is on the table). Nevertheless I set about making as modifications as I could to disguise the silhouette without resorting to taking a saw to the hull.


One of the first things I did was swap the wings left to right to give them a forward sweep for a more predatory look. I also scrapped the sensor array that goes on top and used part of the unit to add an armoured canopy above the cockpit. I had to file and sand it down a bit to get it to fit on the curved hull, but it further changed the look of the original.


Finally, I raided my bits box for some rhino hatches and various extra tech (anything grey in the photos is not original to the kit). I used different bits on each side to break up the streamlined hull and try to make it look a little clunkier. The side propulsion units are some of the most frustrating bit of model I've ever tried to assemble. There are clear plastic bits that fit inside and trying to make everything line up was a nightmare. In the end, I left them out and used textured bits of plasticard to cover these gaps.


Of course, I added an Imperial Eagle on the prow!


While I plan on painting the windows on the cockpit like glass, I'm going to paint the rear windows like the rest of hull, because they are on of the final details that seem out of scale with 28mm models. The only thing this model lacks now is a cargo door, but I'm going to see if I can use paint to give the illusion that the rear hatch folds down.


There are really some nice details on the hull of the kit that don't show up in the photos. All of that white reflected a lot of light and the result was washed out pics... everything will show up crystal clear when I get some paint on this ship!

I'm going to paint it some sort of neutral grey or tan, raid my decal collection for some more detail, and then weather the hell out of it. I want it to look like a work horse rather than a transport for diplomats.

Of course I'll post updates as I have something to report (might be a few weeks as I have a lot on the table)!